Taking apart the Dygma Raise 2 might seem a bit scary, but with the right tools and a little patience, you'll be pulling it apart like a pro in no time. This guide will take you through the process step by step. Don’t worry, we’ll also help you put it back together!
Required Tools to disassembling the Raise 2
Before diving into your Raise 2, make sure you’ve gathered everything you need.
- A soft mat or work surface – Because your desk isn’t as scratch-resistant as you think, and your keyboard deserves better.
- Dygma keycap and switch puller – Two tools in one! Not only useful, but it also makes you feel like a keyboard surgeon.

- A small head screwdriver (preferably magnetic) – Trust us, those tiny screws love to disappear.
- Tweezers – They won’t help you tweeze your eyebrows, but they will help you with your keyboard stabilizers.
- A Dygma bowl – Or any small container to keep all your keycaps and switches in one place.
- 4 bottle caps – To keep all those small screws separated and organized.
Ready? Let’s disassemble that bad boy.

First steps
First things first: unplug everything. Disconnect all external cables from your Raise 2. Never attempt to disassemble the keyboard while it’s still plugged in. Once everything is safely unplugged, move on to the next step.
The next thing to do is to remove the Magnetic Palm Pads. Lift the magnetic palm pads off the keyboard and place them to the side.
Now let's remove the Neuron (if connected). If your Neuron is still plugged into the base, now’s the time to remove that too.

Taking the Face Off
Let's start by removing the Keycaps. Use the keycap puller to remove the keycaps from your keyboard. Use this tool wisely, young keyboard Jedi.

Just a heads up: When you're taking off the low-profile keycaps from the thumb cluster, make sure to pull upward firmly. This will help avoid damaging the stems that connect the keycaps to the switches.

Next, we’re tackling the switches. Grab that switch puller and gently pull the switches out. Be careful not to bend the pins!
For most switches, grab the top and bottom, and pull upward, while holding the keyboard firmly with your other hand.

For the low-profile switches in the thumb cluster, grip the sides instead of the top and bottom.

In this step is where your tweezers come into play. Use them to disengage the stabilizers from the top panel. Press the tabs on both sides of the stabilizer, as shown in the image, and carefully remove the stabilizer by hand.

Let's open it!
Turn the keyboard over and remove all the screws from the bottom panel. Ensure all screws are removed before proceeding.

Now very carefully rotate the bottom panel to open the keyboard and avoid damaging the ribbon cable that connects the two panels.

Speaking of ribbons, now it’s time to disconnect the ribbon cable. Gently lift the black tab where the cable connects to the RF PCB. No need to hulk out here—go slow and steady to avoid any drama. Repeat this on both sides of the keyboard. Make sure the cable is fully disconnected before pulling it out. Repeat this process on both sides of the keyboard.

If you want to go all-in and remove the tenting legs, begin by taking off the small legs first. Press both sides until the leg pops off and then repeat the same process for the large legs and the negative tilt legs.

If you want to know more about how the tenting legs were created, check out this video!
On the inside
Let's start by unscrewing the RF PCB and any pieces securing it.

On the left side, there’s an extra piece holding the PCB in place, unscrew that too.

To disconnect the PCB from the battery, pull the cable upward from the PCB. No need to call tech support—just a gentle tug will do the trick.

Now that the RF PCB is free, it’s time to say goodbye to the wireless button. Carefully remove it from the panel.

It's time for the Keyscanner PCB and the joint!
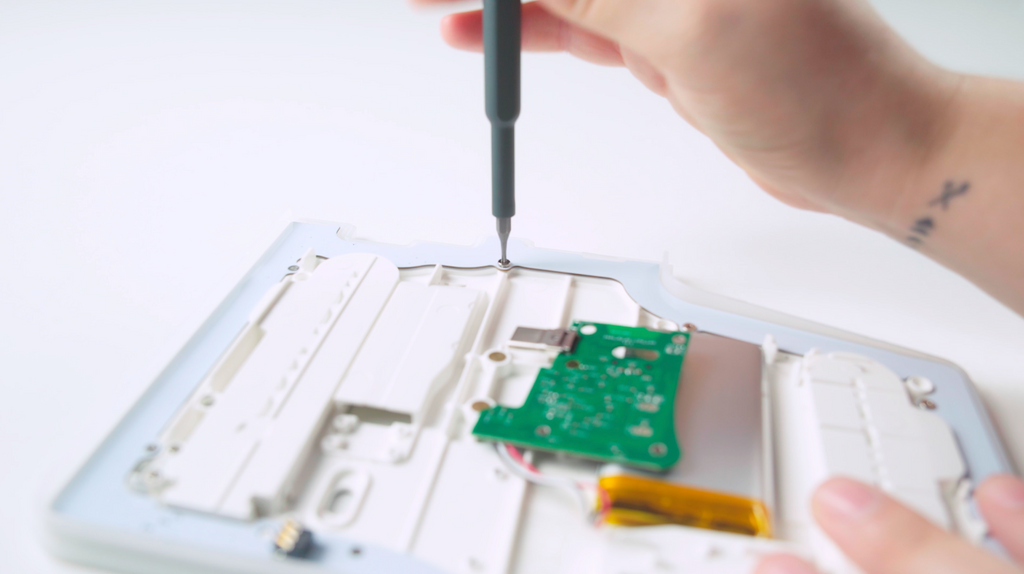
Unscrew the Keyscanner PCB first.

Then unscrew the joint and remove both.

Just a heads up!
Be careful when removing the Keyscanner PCB, keep an eye on the USB C connector to avoid damaging it with the panel.

Carefully lift the foam upward now that the PCB has been removed.

Finally, unscrew the Underglow PCB.
And now separate it from the plastic covering.

Voilà! Your Dygma Raise 2 is now completely disassembled. You did it—and without losing your cool!;

And there you have it—your Dygma Raise 2 is officially in pieces!
By following these steps, you can safely disassemble your keyboard for maintenance, customization, or just for fun (hey, we don’t judge).
Now that your Dygma Raise 2 is in pieces and you've had your moment of glory, it’s time to put everything back together. All you need to do is retrace your steps in reverse and remember when re-screwing the keyboard, to make sure you use the correct screws for each part.
Now, let’s dive into the reverse assembly process!
Reassembly!
Put everything back on the bottom panel!

First, put back together the Underglow PCB to its covering, and screw it back to the bottom panel.

Next, pop the wireless button back into its rightful place. And remember: green side left, red side right. It’s not just a color thing—this is where the magic happens.

Screw the RF PCB back onto the bottom panel, ensuring it’s securely fastened. On the left side, don’t forget to screw in the extra piece that holds the PCB in place.
And connect the battery to it.

Let's prepare the top panel

Place the Foam back. Gently press it into place so that it sits comfortably where it belongs.

Now, reattach the Keyscanner PCB and the joint to the top panel.
This is where you need to be careful with the USB-C connector because now you have to put it back in its hole.

This is the part that requires a little extra care. Take the ribbon cable and gently slide it back into place with the black tab opened, then secure the black tab to lock it in.
This cable is more delicate than a bubble, so be gentle.

Carefully place the bottom panel back onto the top panel, making sure the ribbon cable isn’t getting squished in the process. When both parts are perfectly aligned, screw them together securely.
You’re almost there!

If you removed the tenting legs, now’s the time to clip them back into place. Start with the small ones and press them in until they snap back.
Work your way through the larger legs and the negative tilt legs too.

Last steps!
Time to put those stabilizers back in place. Make sure the little tabs are clipped in properly.
Tip: Be careful not to disassemble them, but if they come apart (hey, it happens), follow the next images to get them back together.

Now, carefully place the switches back into the board.
Watch out for those pins! They’re fragile, and you don’t want to bend them.

The final step for your keys: pop those keycaps back into place!

Last but not least, snap those magnetic palmpads back on.

Final Check: Testing Your Keyboard
Now that your Dygma Raise 2 is back in one piece, it’s time to test everything. Plug in your keyboard and check that all the lights are working—both the underglow and the per-key lighting should be shining bright.
Pro Tip: To make sure every key is functioning, head to Bazecor and assign the Next Light Effect to a key. This will let you access Stalker Mode, a lighting mode that illuminates each key as you press it. Go ahead and press every single key—if the light turns on, you’ve done a perfect job. If something’s off, you might need to revisit a step.
Congratulations!
You’ve successfully disassembled and reassembled your Dygma Raise 2 like a true pro. At Dygma, we believe in transparency with our products, and we’re proud to make keyboards that are easy to disassembly and reassembly—whether you're fixing something, swapping out components, or just exploring out of curiosity.
So, give yourself a pat on the back—you’ve not only upgraded your keyboard but also leveled up your keyboard-building skills.
Now, go enjoy that freshly rebuilt Raise 2 and show off your handiwork!