Hey everyone!
For those who weren’t able to read our last update, Manel went to China on January 14 till January 25 to visit all our factories. And as you know, the Dygma Raise is made up of so many components, each coming from different factories.
It was yet again a productive trip. Manel brought back a huge suitcase full of Raise components and samples from T1, T2, and some even went through T3! (Tooling Test 1, 2, 3)
He had to make sure all components were perfect. These were his expectations and goals for the trip.
GOALS
- Ensure that all the components are being made correctly.
- Validate all components and electronics.
- Clarify the assembly flow, quality control steps and the preparation of all the testing jigs before the DVT.
- Prepare for the packaging, logistics and shipping.
- Instil a good reliable relationship with all people involved in this project.
Manel talking about the trip's goal
The updates below are a combination of videos from Manel’s trip (make sure you get to watch them all), the challenges we encountered, the next steps of each component, and our learnings.
All our NEXT STEPS have already been relayed to our manufacturers. Unfortunately, some of the factories started taking their holidays for the Chinese New Year earlier than expected. We didn’t anticipate this in the manufacturing timeline we proposed before. We assued that all factories would have the same closing dates as our Assembly Factory. But it turned out some of the people, especially the small factories, started closing shop a week before.
We still don’t have the exact date of delivery. Once our manufacturers get back from their holidays, we’ll get a better picture of when mass production will begin. As of now, we’re in the final stages to get all components to the T-off.
1. BASE

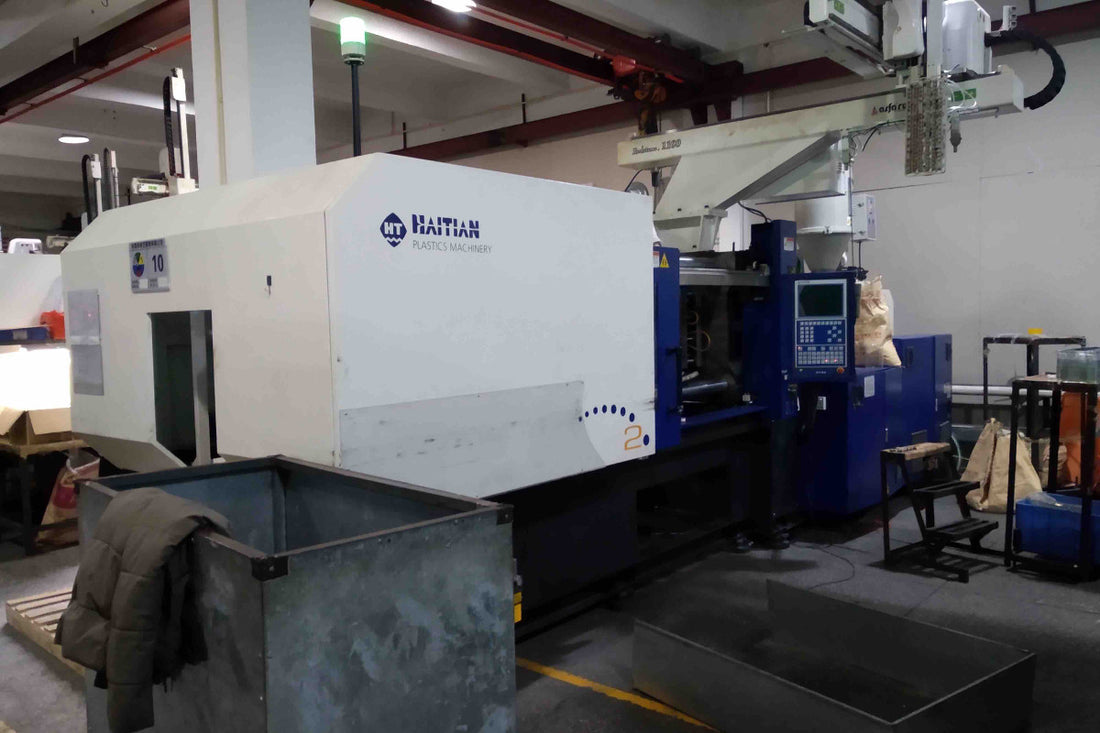
Tooling of the base
The pressure created by the injection machine for the base is an impressive 300 tons! That machine in the photo above will create the base of your Raise keyboard.
This is how it works!
How the base is made part 1
How the base is made part 2
The base is made of 2 types of material: ABS and PC. And getting the right amount of each material is crucial. We needed to get the right amount of transparency without compromising its sturdiness.
This was important because the quality of the base affects the underglow. And the underglow needs to have both an even and intense light, without having any dark spots. So we did numerous iterations to get the best mixture, which led us to T3.

Base iterations
We achieved the correct mixture of the ABS materials but we could still see a few dark spots. The dark spots are caused by the screws in the base that are blocking the light. They’re not clearly visible at first glance because the underglow is quite intense. But after close examination, they become slightly noticeable.
Next steps
We have asked the supplier to reduce the screw housing depth to eliminate the dark spots. We’ve also asked for alternative solutions from our light consultant but we are still waiting to test the best solution.
2. JOINT
How the joint is made
Joint assembly jig
The manufacturers already solved the problem we had with the metal bending. However, we noticed a 0.1 mm gap between the joint and the top case. When the lights are on, you can slightly see light coming out.

NEXT STEPS
We simply need to modify the mold to get the right fit. We will have this fixed after the Chinese New Year.
3. TOP PANEL

Top panel - raw whole material
The finishing of the top panel looks beautiful. We are very happy with the work of our metal factory.
In the first iteration, there was a small gap between the top panel when the keyboard is attached. But this has already been fixed.

First iteration of the top panel with different switches on one side
NEXT STEPS
After the Chinese New Year, the manufacturers will make another iteration of the top panel and then we will check it.
4. HUBLE METAL COVER
5. HUBLE PLASTIC PART
We needed to fix the logo dimensions and position in the Huble. This required us to make another mold.
But everything worked out great! This component is also in the T-off.

Huble component - T-off!
6. MYLAR - BOTTOM PANEL
NEXT STEPS
We need to make the final iteration and add our logo at the bottom.
* Manel's mid-journey insights *
7. RUBBER FEET
NEXT STEPS

8. SPECIAL KEYCAPS
Because the extra thumb keys are so unique, having them made requires a lot of visual supervision. Not only does it need its own mold but also the right mixture. The special keycaps needs to have exactly the same colour and texture as the rest of the keycaps.
These are the molds of the special keycaps.

Outer layer - injection mold of the special keycaps

Inner layer - injection mold of the special keycaps
We encountered a few minor problems but all can be fixed easily.
The first issue we have was that the set of black special keycaps had a different color to the other keycaps. The material also felt weaker.

Black keycaps
The black special keycaps look lighter than the rest of the keys.
And with the white special keycaps, the light seems to shine through more than the normal keycaps.

White keycaps
We also saw some inconsistencies with their dimensions. At close look, the spaces between the keys weren’t uniform. But this wasn’t a problem with the design, it was a problem with how the mold was used.
NEXT STEPS
We asked the double-injection factory, the one who makes our PBT and ABS keycaps, to send us the formula of the mixture they use for their keycaps. Our special keycaps manufacturer will then follow the exact formula. Since they will be using the same amount of materials, the quality of the special keycaps should look the same as the other keycaps.
As for the dimension problems, we already instructed the workers how to make the special keycaps, following the molds correctly. We need to do one last test and if the workers do it properly with the right material mix, then we can validate the tooling.
9. METAL PINS

Bags of metal pins
The diameter of each metal pin needs to be exact. However, when manufacturing a piece this small, there will inevitably be one that’s +0.01 or -0.03. We found out that even the additional 0.01 mm makes fitting the joint a bit difficult.

Finalising the diameters of the metal pins
NEXT STEPS
We need to update the dimensions and tolerance of each metal pin. The diameter of the male pins should be 2.68 (+0,01, -0,03) mm, and the female should 2.75 (+0,03,-0,01) mm.
10. PALM PADS
The casting tooling for the palm pads is ok. But we weren’t happy with the hand-made cut. That’s why the edges of the palms pads didn’t look so smooth in our previous update.
We also needed to decide on a different material of the top layer because the first one didn’t have a white counterpart.

The first palm pad sample

The first palm pad sample
NEXT STEPS
11. ELECTRONICS
Good news is that the factories already have our test jigs and they're all working.
Bad news is that we are still in the pre-certification stage. Even though we already passed most of the tests, we still had some problems passing the ESD test again. We were so close to passing but unfortunately we have to re-do this test again.
NEXT STEPS
We need to modify the Huble’s electronics. This doesn’t affect the keyboard’s functionality. It is more of a legal and exigent certification needed before we begin shipment.
12. CABLES

Cables connected to the Huble
We’re happy with the flexibility and the quality of both the black and white cables. However as you notice in the photo above, there’s a small gap between the plastic jacket and the Huble.
NEXT STEPS
We need to modify a few things with the connector so the metal part of the cable is less visible.
We also still need to do the final improvements by adding more shielding without destroying the braiding.
That’s all for the components!
But besides the components, we have also been working on the logistics. Given all the different switch and keycap options, we are dealing with 126 variations of the product! So it’s quite a complex situation for logistics and the assembly flow.
We are also working on the packaging and all the final things needed for when we fulfil all of your orders.
We’re really in an exciting time in the manufacturing process as this is the last leg or the final lap in the project. And it is also the most important part!
It is quite unfortunate that the Chinese New Year has come right in the middle of this final phase of development. But it just means that when our suppliers are back from their holidays, we will be on it once again at full speed to ensure that you get the best product you’ve all been waiting for ?
FINAL THOUGHTS
Thanks so much for all of your support throughout this time.
- Dygma Team
FOLLOW US (AND DON’T MISS ANY OF OUR AWESOME CONTENT!)
Youtube
