Disassembling the Dygma Defy can be a delicate and potentially dangerous operation. But with the right tools and knowledge, you can make it both fun and entirely safe.
But don't worry! We will take you on a step-by-step journey on how to disassemble and reassemble the Dygma Defy safely.
Equipment List
Before we jump in and begin our guided operation, you're gonna need:
-
A soft mat or working surface
-
A Dygma keycap and switch puller
-
An M2 Phillips head screwdriver - the more magnetic the better
-
1 Dygma bowl
-
4 Bottle caps
-
A Cold Beer
-
Plenty of patience and delicacy
 First steps
Now that you've got all your equipment ready let's begin our operation!
Step 1
-
Unplug all external cables from the Defy. Don't ever attempt to disassemble the Defy while it's still plugged in; this could lead to a rather... shocking experience.
-
Then, remove the magnetic palm pads and place them to the side.
-
If your Neuron is plugged into the base, you'd want to remove that too.
-
Once unplugged, take out your first tool of the day, your handy Dygma keycap puller.

Taking the Face Off
Step 2
When removing your keycaps:
-
Use your keycap puller to approach each key directly from above, allow the prongs to slot over each key, and then pull directly upwards.
-
Upon removing each key, be sure to place it in the correct order on the side; this will save you a lot of time and confusion on reassembly.

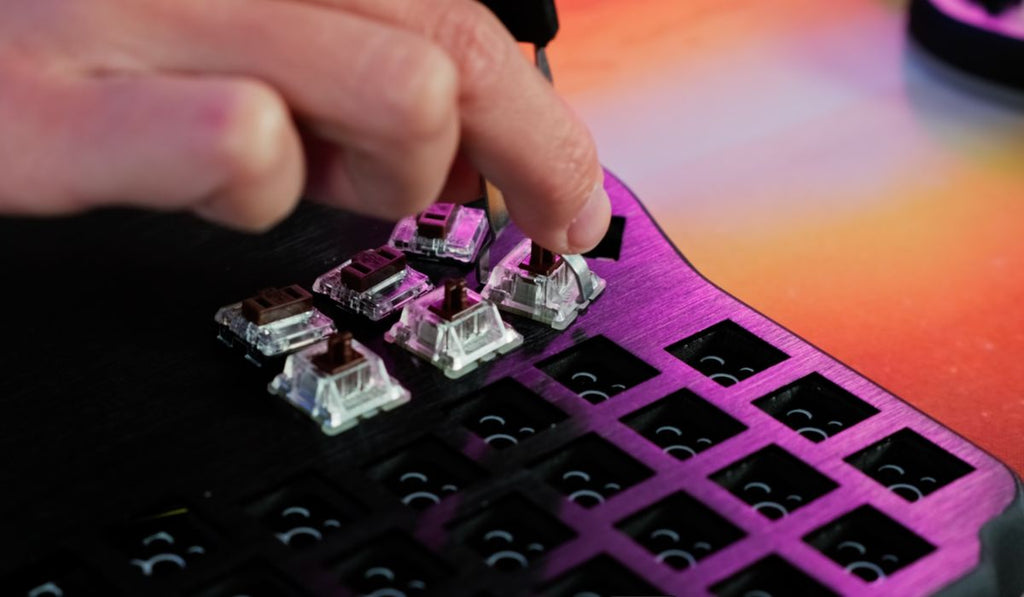
Step 3
Take out those switches using that handy keycap and switch puller. If you look carefully at the switch-pulling side of this wonderful little tool, you'll see it has two claws on each side.
-
These two claws slot over the top and bottom of each switch to activate the little pressure points residing in the switch.
-
Once these pressure points are pushed, the switch will be released with ease. Just make sure, like with the keycaps, you pull vertically and never at an angle.
-
Be careful not to scratch the surface of the Defy with the switch puller; you should only be making contact with the switch itself.
-
Place all of these switches into the Dygma bowl.
-
The low-profile switches residing down here on the thumb cluster have an 'east-west' orientation. Take extra care with these switches... they're delicate little babies.
- They also don't have the same pressure points as the normal switches, so lightly pull on the plastic from either side, and they should come out with minimal force.
Flip It!
Step 4
Looking at the back of the Defy, let's first briefly identify just what everything does. On the outside, we have these flippable side legs. They have a rubber coating to keep the Defy stable when in tenting mode.
Then, we have the built-in, adjustable, metal tenting legs along with the rods that determine the tenting angle. And here we have the reverse tilting legs if you're someone who enjoys getting a little tilted...

Around the outside of each half, you'll see the six screws that hold the top and the bottom of the Defy together.
Right here in the middle, you'll find the four mounting screws that allow the Defy to be mounted to a desk, tripod, or the arms of your chair. Although some may consider it not so pleasing to the eye, we wanted all of our screws to be on full display.
This gives our users full freedom to disassemble the Defy, as well as make quick repairs if necessary.

Finally, on the left side of the Defy, you'll find the Neuron port.
Strip It!
Step 5
Keep in mind removing the side legs isn't really necessary when disassembling the Defy, but we'll quickly show you how to do it anyway.
-
Starting with the little side legs, press on the bottom to unclip the prong; it should just pop out.
-
Then, moving onto the tenting rods, they should just pop out the same way the side legs did.
-
Now, to remove the tenting legs, squeeze either side at the base of the leg so that you can pull it out. The longer knob always pointing away from the center of the keyboard!
-
Be careful here; bending these legs will end up giving you a wobbly keyboard when tented, and nobody wants a wobbly keyboard...
-
Last but not least, the reverse tilting legs.

Step 6
We're now ready to open the Defy.
-
Take that M3 Philips and unscrew the 6 outer screws on each half. This is where those bottle caps come in handy. It shouldn't be too hard to unscrew but make sure you apply a little pressure so as not to damage the screw heads.
-
Loosey lefty, righty tighty!
Lift slowly from the bottom of the underside to look into the Defy here; you'll see there's a ribbon cable or BUS cable connecting it to the topside.

-
Make sure you place the top side perpendicular to the bottom side to minimize stretching the ribbon cable. This is pretty easy to release, but do it carefully!

-
See these two black mini prongs that protrude from each side? Lift those away from the top side of the Defy like this.

-
You can use your nails, but if you've bitten all your nails, then you can use the switch puller to help you. Remember, be careful!

Boom. You've now separated the topside and the underside.
Step 7
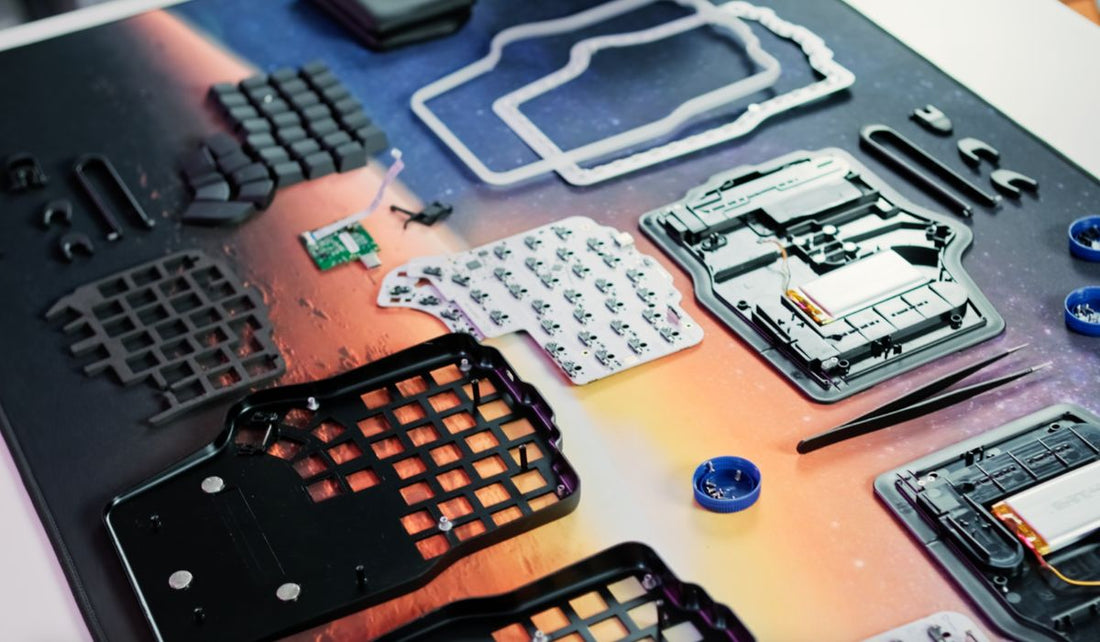
Before we start disemboweling our beautiful Defy, let's first check out what's in here:
-
On the underside of the Defy, you'll find the battery.
-
The RF PCB connects to the battery and the under-glow PCB.
-
You'll also find the little connector on the side that gives power to the under-glow PCB once the top and bottom sides are sandwiched together.
-
On the topside, you'll find the low-profile PCB and the key scanner PCB. These curious little magnets are actually what hold your palm pads in place.

Underside Disembowelment!
Step 8
Because of its complexity and risk... we're going to start with disassembling the underside of the Defy.
-
Taking that trusty screwdriver, let's first remove the under-glow PCB. There're 4 screws around the outside, using the same pressure as before.
-
Take those out and keep them separate by putting them in another one of your trusty bottle caps.
-
The under-glow PCB should just pop out nicely and easily. If you give it a flip, you'll see all of the lovely 63 RGBW LEDs that give The Defy its gorgeous under-glow. It's the best out there.
Next up,
-
Remove the battery cable that connects to the RF PCB. It looks more complicated than it is!
-
Just take your thumb and index finger, get a firm grasp of the end of the cable where it meets the plug, and gently pull up and away from the RF PCB.

Job done!
-
Once unplugged, the RF PCB can be unscrewed and removed. Again, keep the 3 screws safe in another bottle cap.
-
You'll see there is a small piece of plastic screwed on each side on top of the RF PCB.
-
This can be removed. This piece of plastic keeps the PCB in place, and, for the left side, it protects the Neuron connector from wibbly wobbling around.
It's important to note that these little guys are switches for the RF PCB, and they can come out. So make sure you don't lose them! And when you put them back, the right is red; the left is green.

-
Then, if you lightly pull back on the ribbon cable, you'll see that there's double-sided tape holding it in place.
-
This will allow you to remove the RF PCB fully.
Now Dygmates! Take a breather because we're about to perform the most dangerous act possible when disassembling the Defy.
The battery removal
Step 9
In all honesty, there's no real reason for you to remove this. If you even slightly pierce it by accident, the result could be a hazardous, firey mess. It's just too risky.
If you want to have the battery replaced for whatever reason, we recommend that you just send it back to us and leave it to the professionals.
You'll see a little insert at the top and bottom of the underside of the Defy. By tightening this screw with the tenting legs attached, you'll increase or decrease the ease of movement of the tenting legs themselves.
However! Take great care with this, too; if you screw this too tightly, you could disturb the straightness of the leg and again end up with a wonky tented keyboard.

And just like that, we've fully disassembled the underside of the Dygma Defy!
Step 10
The top side is a lot simpler, THANKFULLY:
-
Unscrew the 4 screws that hold the key scanner PCB firmly in place.
-
Then, lift that glorious key scanner PCB out and take a look. If you're thinking this looks like some form of projectile murder weapon, you'd be right.
-
The felt on the topside of the key scanner PCBs acts as a form of protection for the individual key LEDs. As the LEDs protrude a little, this felt makes everything the same level.
If you want to know more about these awesome RGBW LEDs, check out this video:
-
On the bottom side of the key scanner PCBs, you'll see all of the chips and lines of information.
-
Underneath these weapons, I mean key scanner PCBs, you'll see a layer of soft foam. This acts as a high-frequency sound absorber.
-
That can be taken out and played with, too, but it doesn't work so much as a weapon.
-
Finally, the stabilizer can be removed and set aside. This doesn't necessarily need to be removed.
The Dygma Defy has officially been disemboweled, I mean disassembled!

Reassembly!
Before we put the Defy back together, remember that with all screws, none of them need to be overly tight. They're delicate little beings that don't like to be screwed around too much, so keep it firm but not overly tight.
Step 11
-
Start by popping in the stabilizers and then lay the sound-dampening foam back in place, followed by the key scanner PCBs, felt side down.
-
Secure that with the right screws; remember, firm but not overly tight.
-
That's the topside of the Dygma Defy complete!
 Step 12
The underside is slightly more complex, but the hard work is over:
-
Slot your RF PCB back in place, making sure it's the correct way.
-
Then restick the ribbon cable tape and lightly screw the RF PCB in place.
-
Reconnect the battery by pressing the plug with a little pressure; a click sound will let you know it's in place.
-
The under-glow PCBs should almost fall right into its correct position. Just be sure to first lay the under-glow diffuser before laying the under-glow PCB on top.
-
Don't trap the ribbon cable underneath the under-glow PCB!
-
When ready, get screwing!

Important reminder, you don't need to screw this in tightly at all. You see, the connector of the LEDs, this right here, needs to touch these things on the Key Scanner PCB.
So, if you tighten the sides, it might not touch. So again, don't screw this in tightly at all.
Just like how you unclipped the ribbon cable before, lay your topside perpendicular to the underside, ensure the clip is lifted away from the base, and then plug the ribbon cable back in before pushing the clip back down.
Then carefully close the Defy!

Step 13
-
Get those final screws in place; there should only be 6 left! If you have more, you may need to revisit the reassembly section to find out where they go!
-
Reconnecting the legs is a piece of cake! The prongs flex without too much pressure and can slot into place pretty easily. Just remember, the longer prong goes in first! The longer knob is always pointing away from the center of the keyboard!
-
When attaching the tenting angle rods, be sure to do so from the underside of the legs; this is to ensure the rods don't protrude over the top surface of the legs.

-
Now, before replacing all switches, keep in mind that this can be a little bit of a delicate operation.
-
Take a look at the underside of a switch; you'll see the little metal pins that connect the switch to the Defy. If one of these pins is slightly bent, it won't enter the plug and will instead bend further out of place when pressed.
-
This is something you do not want to happen. Of course, you can easily straighten the pin with a pair of tweezers, but if using the right method, this won't be an issue.
My personal method, which I consider the best method, is to lay the pin on top of the port, ensuring it's nice and lined up. As a visual reference, this little square hole, where the LED shines out from, should be at the top side when placing it in.
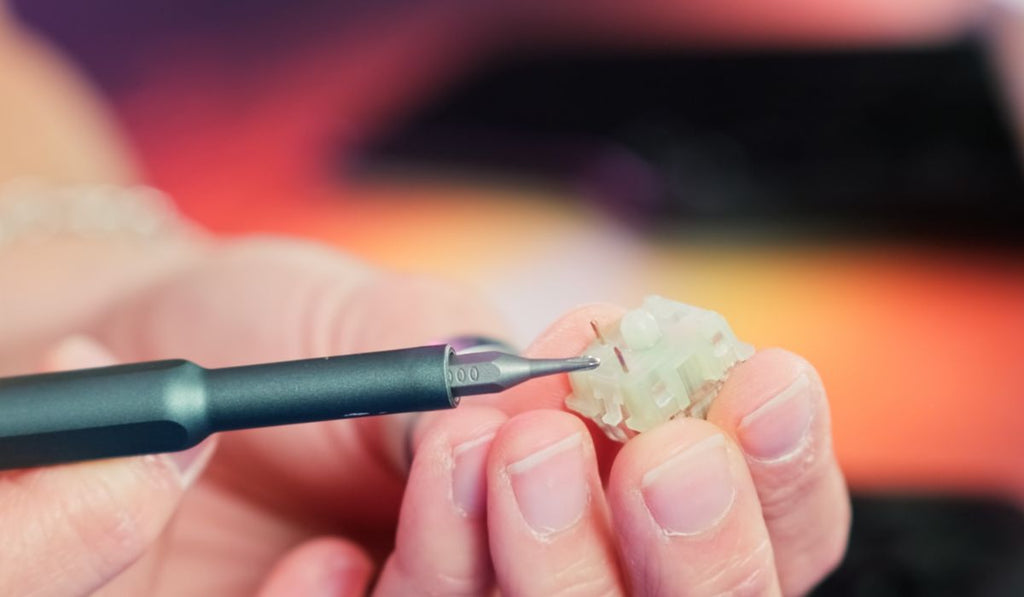
-
Then, apply light pressure to the bottom to ensure the pins are the first to enter before pushing the top of the switch and clicking it into place.
-
Do this on the other side of the Defy, too.
-
At this point, feel free to plug in the Defy to make sure you have a stable connection by pushing a switch on each side! Do we have lights?
-
If yes, you're ready to plug in the remaining switches!
-
If not, you probably need to check the wiring to make sure everything is correctly in place!
Remember, the switch order doesn't matter; just make sure the low-profile switches are kept for their thumb cluster places!
Step 14
-
Replace keycaps of The Defy!
-
These are much easier than the switches, as long as you kept them in the right order!
-
Just a little pressure in the center of the key, and it will pop into place.
 Our final check is to set the Defy to tracer mode and check that every key has a stable connection. Plug in the Defy, head over to Bazecor, and select Stalker Mode.
Then, drag your fingertips over all the keys like this to make sure every single one lights up. This is our way of checking for signs of life. 
Celebration Station!
You have now successfully disassembled and reassembled your Defy split wireless keyboard! Take a breather and bathe in your accomplishment!
Our goal at Dygma is to keep our products transparent. We pride ourselves on knowing that our customers can easily disassemble our products with relative ease, whether it be to fix or replace a certain component or just to feed that childlike sense of curiosity that we so dearly appreciate.
Thank you guys for tuning in!
- The Dygma Team