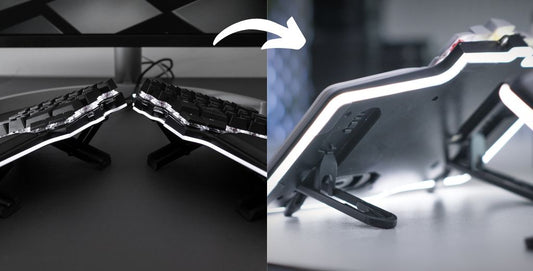
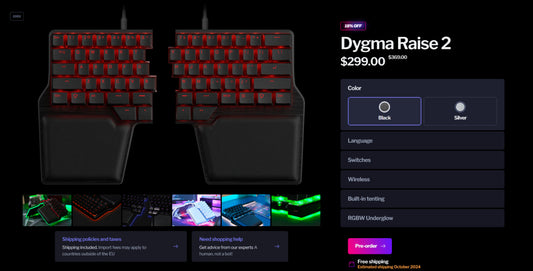
What’s interesting and unique about the Raise keyboard is that it’s a split keyboard that can be attached and detached. And finding the best solution to achieve a good design for this feature can be challenging.
We knew that we wanted a great solution for this feature. So we have been working on this design since the beginning of the project.
https://youtu.be/lm1pluXftOE
 Our first prototype did not have a solid piece or a joint, to connect them together. It only had magnets to join the two halves. It would stay connected if you moved it around the table but it detached easily when picked up. It wasn’t as strong and sturdy as we had wanted it to be. We wanted the connection to be more stable and solid. So we moved to our second concept.
 For the second prototype we used a metal joint. Each side of the keyboard had the joint soldered. One had the male interface, and the other had the female. The joint piece is made of CNC aluminium which looked well suited for the aluminium body of Raise.
 It was clearly stronger than the previous prototype. It also used magnets so the resistance was better. But we realised that the fitting was not that reliable. After continuous use (constant detaching and attaching), the joint wore down. The connection became less rigid. So we decided again to build on the next concept, the plastic joint.
 This was a cool concept for us. We used a technical plastic, POM, also called Delrin, to create the joint. It was a Japanese joint: a male and female joint with a widening shape that had more optimal surface contact.
 We were so close in reaching the final objective with this concept. We even created a plastic block to test with our keyboard.
 But it was difficult to prototype and also difficult to modify. We had to take into account that this concept could be too risky especially for a product such as Raise. This led us to our fourth and final concept, the metal pins.

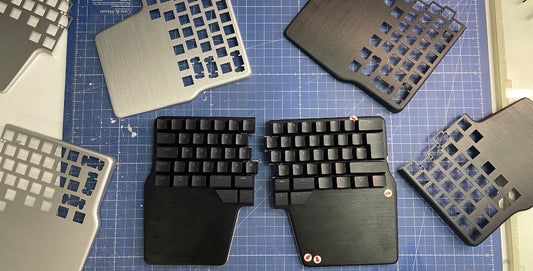
 The metal pins are made of stainless steel. They are easier to modify and they do not wear out. We first tried attaching 4 metal pins in the keyboard but now we are only using two.
 It’s easy to attach and detach the keyboard using these pins. And it’s more stable. It also uses magnets to give it a better feeling.
We’ve learned a lot from this concept. For example: when we attach the keyboard, we apply more force at the bottom (where the palm rests are). So we need stronger magnets in the bottom and weaker magnets at the top. We also realised that we need shorter pins in the top and longer pins at the bottom.
It’s easy to attach and detach the keyboard using these pins. And it’s more stable. It also uses magnets to give it a better feeling.
We’ve learned a lot from this concept. For example: when we attach the keyboard, we apply more force at the bottom (where the palm rests are). So we need stronger magnets in the bottom and weaker magnets at the top. We also realised that we need shorter pins in the top and longer pins at the bottom.

 Now we’re in the process of finding the right balance for a strong joint, while still maintaining the easy feeling when detaching and attaching the keyboard.
We want users to feel comfortable attaching and detaching the keyboard. But when it’s attached, the keyboard needs to be firmly and completely linked.
Now we’re in the process of finding the right balance for a strong joint, while still maintaining the easy feeling when detaching and attaching the keyboard.
We want users to feel comfortable attaching and detaching the keyboard. But when it’s attached, the keyboard needs to be firmly and completely linked.
 Manel is now in China for a few days. He will be meeting with our manufacturers to discuss the next steps of development.
We will post an update next week with all our progress.
Thanks ever so much for following!
What’s interesting and unique about the Raise keyboard is that it’s a split keyboard that can be attached and detached. And finding the best solution to achieve a good design for this feature can be challenging.
We knew that we wanted a great solution for this feature. So we have been working on this design since the beginning of the project.
Manel is now in China for a few days. He will be meeting with our manufacturers to discuss the next steps of development.
We will post an update next week with all our progress.
Thanks ever so much for following!
What’s interesting and unique about the Raise keyboard is that it’s a split keyboard that can be attached and detached. And finding the best solution to achieve a good design for this feature can be challenging.
We knew that we wanted a great solution for this feature. So we have been working on this design since the beginning of the project.
Our first concept: No joint, just magnets
Our first prototype did not have a solid piece or a joint, to connect them together. It only had magnets to join the two halves. It would stay connected if you moved it around the table but it detached easily when picked up. It wasn’t as strong and sturdy as we had wanted it to be. We wanted the connection to be more stable and solid. So we moved to our second concept.
Second concept: The metal joint
For the second prototype we used a metal joint. Each side of the keyboard had the joint soldered. One had the male interface, and the other had the female. The joint piece is made of CNC aluminium which looked well suited for the aluminium body of Raise.
It was clearly stronger than the previous prototype. It also used magnets so the resistance was better. But we realised that the fitting was not that reliable. After continuous use (constant detaching and attaching), the joint wore down. The connection became less rigid. So we decided again to build on the next concept, the plastic joint.
Third concept: The plastic joint
This was a cool concept for us. We used a technical plastic, POM, also called Delrin, to create the joint. It was a Japanese joint: a male and female joint with a widening shape that had more optimal surface contact.
We were so close in reaching the final objective with this concept. We even created a plastic block to test with our keyboard.
But it was difficult to prototype and also difficult to modify. We had to take into account that this concept could be too risky especially for a product such as Raise. This led us to our fourth and final concept, the metal pins.
Final concept: Metal pins
The metal pins are made of stainless steel. They are easier to modify and they do not wear out. We first tried attaching 4 metal pins in the keyboard but now we are only using two.
It’s easy to attach and detach the keyboard using these pins. And it’s more stable. It also uses magnets to give it a better feeling.
We’ve learned a lot from this concept. For example: when we attach the keyboard, we apply more force at the bottom (where the palm rests are). So we need stronger magnets in the bottom and weaker magnets at the top. We also realised that we need shorter pins in the top and longer pins at the bottom.
Now we’re in the process of finding the right balance for a strong joint, while still maintaining the easy feeling when detaching and attaching the keyboard.
We want users to feel comfortable attaching and detaching the keyboard. But when it’s attached, the keyboard needs to be firmly and completely linked.
Manel is now in China for a few days. He will be meeting with our manufacturers to discuss the next steps of development.
We will post an update next week with all our progress.
Thanks ever so much for following!
What’s interesting and unique about the Raise keyboard is that it’s a split keyboard that can be attached and detached. And finding the best solution to achieve a good design for this feature can be challenging.
We knew that we wanted a great solution for this feature. So we have been working on this design since the beginning of the project.
Our first concept: No joint, just magnets

Second concept: The metal joint


Third concept: The plastic joint


Final concept: Metal pins