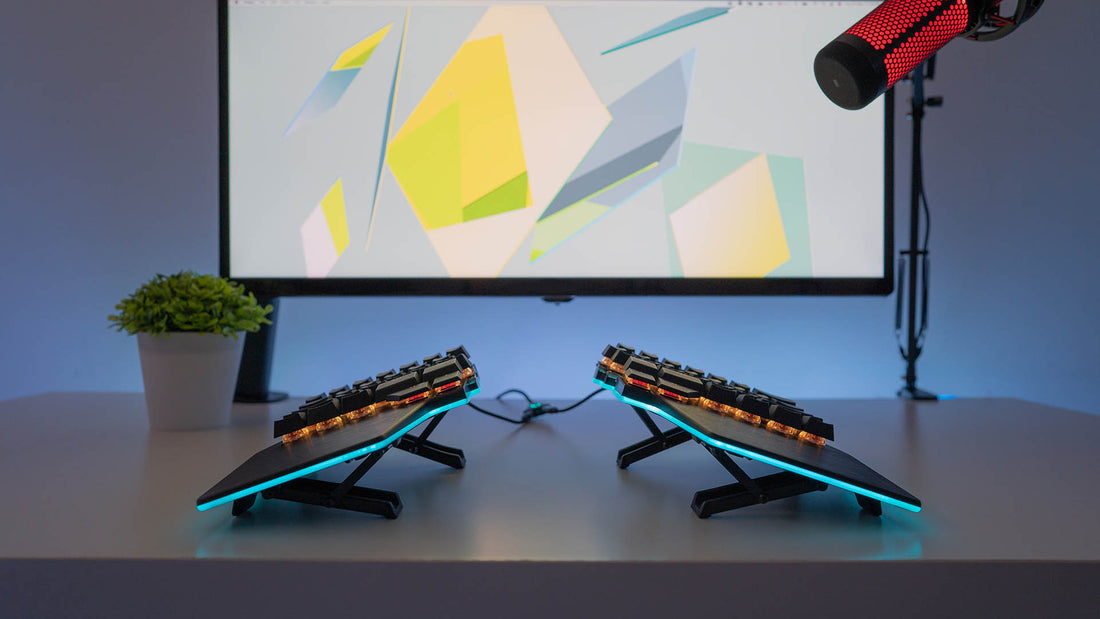
The story of the Dygma Raise Tenting Kit
More and more people have been asking for a tenting kit with their Raise keyboard. Since it's an ergonomic keyboard, one would assume that a tenting kit would at least be given as an option.
Since the beginning of the Raise project, we've actually promised to develop a tenting component with the Raise. We've always thought of it as an add-on component, separate from the keyboard, but compatible with all Raise versions.
Why a separate tenting kit
Well, because having the underglow and tenting wasn't possible due to how the underglow takes up all the space inside the keyboard.
So with the tenting kit as an add-on, one can simply attach it or detach it to the base.
We've been creating different development ideas for the tenting kit for more than a year now. It's had its ups and downs. And this is the story of its development.
When it started
It was February 2020 when we began conceptualizing different tenting solutions.
There are three main attributes that we focused on:
-
Functionality - the tenting component needs to be detachable and adjustable.
We want it to have multiple angles for the user. We also want users to have an easy time mounting and unmounting it without compromising its durability. This leads us to the second characteristic.
-
Stability – The tenting kit has to be robust and stable. Not only should the design ensure that, but also the quality of the materials. We want it to have the same quality as the Raise and this brings us to the last characteristic, aesthetics.
-
Aesthetics – the tenting component has to look, as Manel our Product Manager would say it, “beautiful”.
It was really important for us to find a balance between these three things. But it was also difficult.
Other keyboard tenting kits in the market
Ergodox and UHK offer separate tenting kits with their keyboards as well however we saw a few design flaws that we thought we could improve.

Ergodox with Tenting UHK with Tenting
First, their tenting and tilting solution offered limited angle ranges. The maximum angle you could get was 15º. So we wanted to make sure that we could offer more angles than what's available in the market.
Second, the metal legs (specifically of Ergodox) weren't user-friendly. You would need to adjust each leg and do trial-and-error to see if it's stable on the desk. It didn't have a good user experience and didn't feel very secure. This is why we wanted to make sure that our tenting kit was really easy-to-use and stable.
Lastly, both their tenting solutions didn't have an aesthetic appeal. We highly value aesthetics and need our tenting solution to be beautiful.
There is another option from Kinesis that reaches 90º and costs $150. Though it offers more angles, this add-on is very bulky and isn't intended to look good. Plus, the 90-degree angle is not practical for regular desks because of how your arms would need to elevate in order to reach the home row.

Kinesis Freestyle with tenting add-on at 90º
Dygma community tenting kits
Most tenting kits you then see online are either custom-made, 3D printed or recycled from a random thing you use in your house like a doorstop... or popsicle sticks 😅

Doorstop tenting u/Rofupi Doorstop tenting u/artebus83

Cardboard and popcicles by u/artebus83 Cardboard and popcicles
Here are the more 'advanced solutions'.
From Darren Hallihan https://www.thingiverse.com/

From u/drumnbace_ From u/geekrelief
The logic behind our design decisions
The main challenge was to get a reliable and stable tenting system that could have multiple angles, between 0º to 40º.
After testing the typing feeling with different angles, we concluded that 40º was the maximum angle the kit should have. When more than 40º, the hands start to slide from the keyboard, needing you to float your hand while typing, thus tiring your arms.
We also needed to make sure that the user experience when changing angles was seamless or at least not too complex.
Our first design concepts
Design 1: Metal Bars
We explored many design concepts. The first design concept was having adjustable metal bars at the base. We thought this was a good design. It was cheap yet very resistant and stable.
There were 3 fixed angles which would be locked in using magnets.

Design 1: Metal Bars 3D

Design 1: Metal Bars Prototype
As a first concept, we knew that we were going in the right direction. However, we didn't like its aesthetics. The problem was that the shape of the bar didn't suit the shape of the Raise.
Design 2: Metal Legs
So we tried another idea: having adjustable metal feet. This was an easy and simple solution.

Design 2: Metal Legs
This is also the common way other split keyboards offer tenting.
But this design failed our standards as it didn't meet the functionality we wanted. It was limited to having one angle per leg. It also wasn't foldable so wasn't ideal for travel. One other aspect we wanted with the tenting kit was that it would have the least impact on the keyboard when not in use.
Design 3: Metal Slates
So we moved on to a third concept which involved metal slates and was actually inspired by one of our Dygmates who posted this photo of his Raise on bookends on Reddit. See post here.

Reddit - Dygma Raise w/ DIY Tenting Design 3: Metal slates
In the third concept, we found that the tenting was more stable. We also preferred how it looked. So we started developing that design; however, the development was cut short.

Design 3: Metal slates Design 3: Metal slates
This led to another challenge that was somewhat unexpected. The cost.
We initially worked with multiple companies here in Spain since China was still closed due to the coronavirus. We checked to see if any one of them could produce our components at an affordable cost. But no one could.
We wanted the material to be aluminum and have the same finishing as the body of the Raise with its round edges.
Due to its material and non-traditional design, the cost for manufacturing this was expensive.

Design 3: Metal slates 3D
Once China opened for business, we continued the development of the tenting. We had hoped that since we would be manufacturing the tenting components in China, the cost would be cheaper. But it wasn’t.
Because of the low quantity of components, the cost was just too high. We would be selling the tenting component for at least $150. Knowing our market, we knew that price was too high.
Low demand meant a simpler design
By May 2020, we had decided to only produce between 50-100 units. At that time, there was not a huge demand for the tenting kit.
And if you know how large-scale manufacturing works, you’d know that producing something that few, will be at a greater cost. Something as simple as anodizing a metal piece becomes very expensive when it’s for less than 1000 units.
We needed a solution that wouldn't be expensive to manufacture.
So we had to divert to a simpler design.
Design 4: Metal Legs version 2
We went back to the metal legs idea and modified it slightly. In this version, the metal legs would be attached to a panel that has the shape of the Raise.

Design 4: Metal Legs 20º (version 2) 3D
Although it was a simpler option, it had one drawback. It could only allow 10 degrees and 20 degrees. So it didn't meet the functionality that we wanted.

Design 4: Metal Legs 10º (version 2) 3D
But what was interesting about this design was that we explored the idea of allowing users to create their own tenting feet. Our plan was to design this in a way where we can upload files of longer legs and users can simply 3D print them and use them if they prefer their tenting to be higher
Design 4: Metal Legs 20º (version 2) 3D with keyboard

Design 4: Metal Legs 20º (version 2)
Months later and after testing prototypes with suppliers, we realized that this solution just wasn’t good enough. It lacked the option to have more angles and also didn't look beautiful.
For it to have more angles, every leg would've needed to be curved. If not, they would be more visible. We would've needed to create 4 legs for every angle we wanted, making the tenting kit expensive and impractical.
Not good enough. On to the next design!
Design 5: Lego design
On to the next design - the lego design.
The idea of this design came from, you guessed it, lego blocks. With this design, the user can stack multiple blocks, each block at 5º, to create their desired tenting angle.
We actually loved this design because it was easy to adjust and allowed up to 50º of tenting.

Design 5: Lego design
But after speaking with a consultant who specializes in this kind of plastic piece, he informed us that this was technically very difficult to produce.
The fitting between the pieces needed to be precise. It was difficult to find the correct dimension to make all the pieces fit as one solid piece and not have it too tight so it could be detached easily. It was easy to test this on smaller angles, but difficult with bigger angles.
The cost was also a problem. For this design, we needed to have 2 molds with 6 or 8 cavities and 2 metal panels. It was ultimately too expensive.
So on to the next design!
Getting closer to the final design
This next design started to have the mechanism that we were looking for.
It involved a metal sliding mechanism and rails.
Design 6: Rails design

With this design, users will be able to adjust the angle by sliding the top metal leg and screwing it to the bottom leg.

Design 6: Rails design Prototype Design 6: Rails design Prototype
Design 6: Rails design Prototype Design 6: Rails design Prototype
Demand started to grow but...
At this point of the development, we had received many more people signing up in the Raise Tenting Kit Waiting List. So we decided to produce 300 units.
After testing the Rails prototype, we came to the conclusion that the adjustment of the angles just wasn't smooth or stable.
Allowing the axle to slide along the rails gave more angle options in increments of 5. However, there were three main issues with this design:
- It was difficult to have all the legs be in the same position.
- Sliding the axle on rails meant that if enough pressure was applied onto the keyboard, the axle could slide out of position or bend the metal leg.
- The sliding motion meant that the metal parts would be rubbing against each other and could shorten the lifespan of the product.
We had to create an adjustable system that was sturdy and easy to set up.
So this led to our latest, last, and final design.
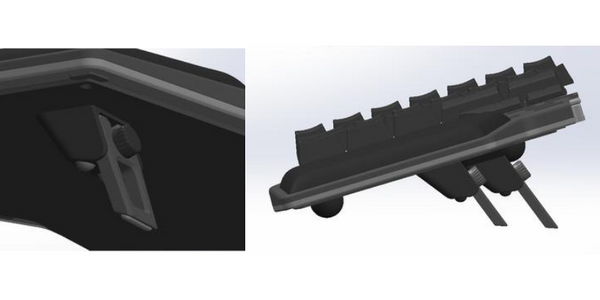
The final design
Our final design finally meets all our required criteria.
- It offers a range of angles: 10º, 20º, 30º, 40º. — Functional
- It is intuitive and easy to assemble. Users can attach it and detach it from the Raise. It secures the keyboard well and is stable when in use. — Stable
- It has the same finishing as the [sides of the] Raise. The tenting itself consists of a plate made of galvanized steel that would be powder-coated into either black matte or white matte. It has silicone for the legs to prevent the device from sliding on any surface. — Aesthetics

Black Raise Tenting Kit Sample at 40º
The tenting plate will have 5 screws that users can attach to their Raise keyboards. The tenting kit will be compatible with all Raise keyboards 👍

Black Raise Tenting Kit Sample
Since the Raise is not straight on its sides, we had to put two legs on each side as the base for the tenting movement. They provide a cohesive look and a stable contact surface.
To make sure that the stabilizers can withstand pressure onto it, we made them part of the metal plate. Silicone is then wrapped around it.

Black Raise Tenting Kit Sample at 0º
Apart from wanting a very stable tenting kit, we also wanted it to have as little impact as possible to the overall design of the keyboard. We wanted to make the keyboard as flat as possible even with the tenting device attached to it.
At 0º, keyboard if lifted 1cm from the desk.

Black Raise Tenting Kit Sample
This was a challenge for us but we were able to solve this by making the angle selector narrow enough so it can fit inside the leg when closed. The axle is then placed at the top of the angle selector.

Black Raise Tenting Kit Sample - angle selection
Q&A with Jose, Lead Designer of the Tenting Kit
How do you mount it to the keyboard?
We really wanted to make the mounting process simple for the user. The tenting kit comes with 10 screws (5 for each side) and a screwdriver. The user removes the screws from Raise and screws in the tenting kit to the base of the keyboard.
From there on it's easy and quite intuitive.
What will be the range of tenting?
The angle ranges from 0 to 40 degrees. In our previous design concepts, we explored having more angle options. However, our main focus was that the tenting kit would be reliable and sturdy, and also practical.
A tenting angle of more than 40º is already going out of the limit of what a comfortable usage of a tented keyboard is. One would need to lift their hands while typing on a 90-degree angled keyboard, for example. And that's not comfortable at all.
After numerous iterations, we finally decided that 40º was the maximum angle we could get which still ensured the keyboard was stable.
What's the material of the tenting kit?
The tenting kit is made of powder-coated steel. The angle selector is made of ABS plastic which is screwed onto the steel. There are silicon parts for the feet so that the kit doesn't slide off.
Can the tenting kit fit into the current Raise carrying case? If not, will you be making a separate carrying case for the tenting kit or a new case that can hold both the tenting kit and the Raise?
No, it doesn't fit. We don't have plans of making a separate or new case yet. But if we see that there is a demand for it, we will consider making one.
What happens if a person pushes down on one, will it break or just flatten and need to be reset?
Take into account that we are talking about a steel-stamped plate. It's 1mm thick. This thing is built like a tank. If you do forcefully push it down, and I mean really push it, then what could happen is that the axle pops out and the keyboard goes flat. But the metal sheet is quite strong and resilient.
How easy are they to replace if something got broken? Could they be replaced with off-the-shelf components?
The tenting kit is very resilient. All parts are replaceable and are easy to replace. The only components you can buy off-the-shelf are the screws and axle. But for the rest, we will have those spare parts so if anything gets broken, we will be able to fit it.
How heavy is the tent kit? And is it the same size as the whole keyboard base? (Thinking about portability)
The tenting kit is about 500g. Yes, from the top view, it has the same dimension as the Raise.
The wait is almost over, hold on to your seats to know the launch date soon!
We will be manufacturing 500 units of the tenting kits, both for black and silver.
Get your tenting kit now